• All about me
  • Blog
  • Favourite links to blogs, places and people
  • Features and Interviews
    • An interview with Dee Hardwicke
    • Knitwear designer Martin Storey – an interview
    • Louisa Harding, knitwear designer talks to Annie Windley
  • How to guides
    • 1 Making a slip knot
    • 2 Cast on – a step-by-step guide
    • 3 Knit stitch – a step-by-step guide
    • 4 Purl stitch – a step-by-step guide
    • 5 Cast off – a step-by-step guide
    • 6 Making a chain stitch
    • 7 Making a double crochet stitch
    • 8 Making a treble crochet stitch
    • How to make a Basic Granny Square
    • Joining granny squares
  • Lessons in Thanet and North London
    • Crochet projects
    • Now We’re Knitting! (beginners)
  • Patterns
    • Annie’s Advent Calendar: Christmas CAL 2018
    • Carrot & pea bunting pattern
    • Fallen Leaves Autumn Cowl
    • Floral granny squares & little flowers pattern
    • Little crochet heart pattern
    • Little Tea Cosy pattern
    • Waffle Blanket
  • Shop
  • Spring Granny-Square Bag CAL pattern
Picking Up Stitches

Knitting, crochet, cross stitch and more - the wonderful world of working with wool

Month: May 2020

Lining the Spring Bag

May 26, 2020 by Annie Leave a Comment

A lining for your bag

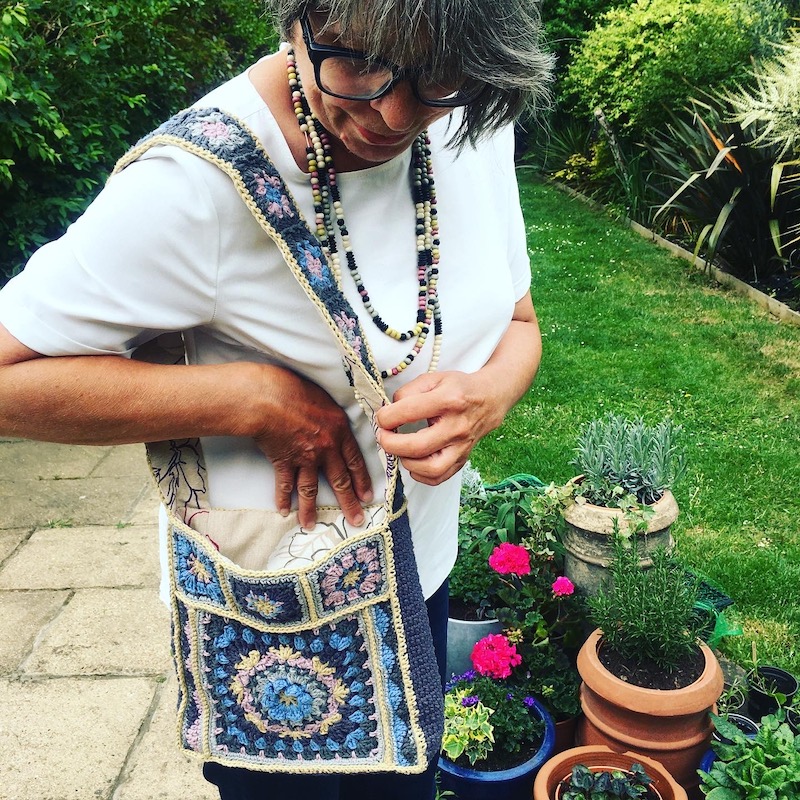
I decided to add a lining to my finished crocheted Spring Granny Square Bag. I’m no expert at sewing, so I thought I’d draw some diagrams which hopefully might help any of you who haven’t done much sewing like me!

And if you haven’t crocheted a bag yet, why not head back and start here.

Choosing the fabric

Luckily I had lots of scraps of fabric in my craft room – collected from working on women’s magazines over the years – there were always lots of samples left over from features that were just too good to throw out!

I decided on a stiff cotton upholstery fabric that held its shape well but wasn’t too stiff and bulky. It’s best to choose something with a bit of substance to help the bag keep its shape – so avoid flimsy or shiny fabrics.

Now I had to work out which way the grainline ran. This is a technical term, I know, but it’s important when cutting out pieces – if you don’t cut along the grainline when making this lining, the fabric may stretch out of shape. The fabric has threads that run both ways if you look carefully – imagine a weaving loom, with some threads going from top to bottom (the warp thread – which is the grainline direction) and the shuttle weaving in and out of these threads from left to right and back again (the weft threads). At each side of the fabric is a selvedge – these are the finished edges down either side that don’t fray – you’ll often find information printed down this edge of the fabric.

The grainline runs up and down the fabric, parallel to the selvedges.

Here’s a picture of the selvedge of the fabric I used. You can see there’s a handy arrow showing the direction of the grainline.

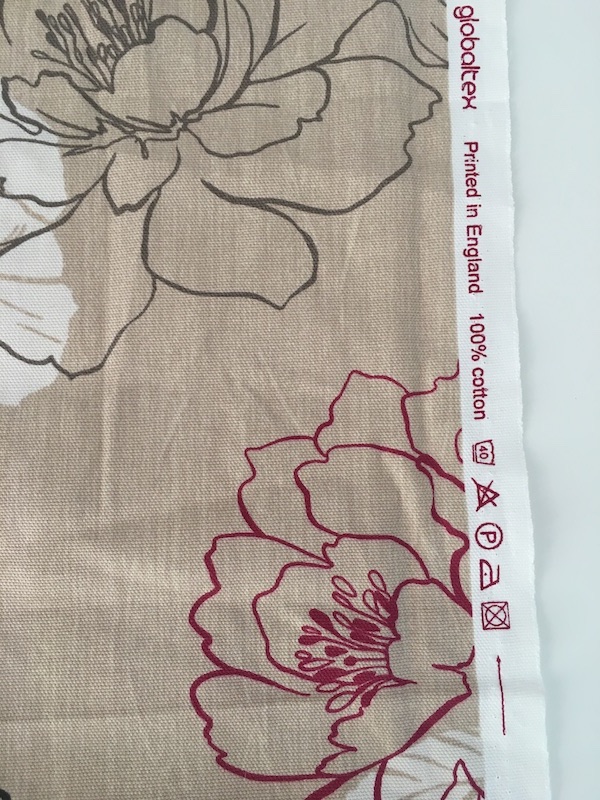
So the grainline is running up and down the length of the fabric.

Now you need to measure your finished bag carefully.

Measure the main square on the front – from side to side (A) and top to bottom (B). Note down these measurements – my bag was exactly square 25cm x 25cm, but it doesn’t matter if yours isn’t, just note down the measurements you have.

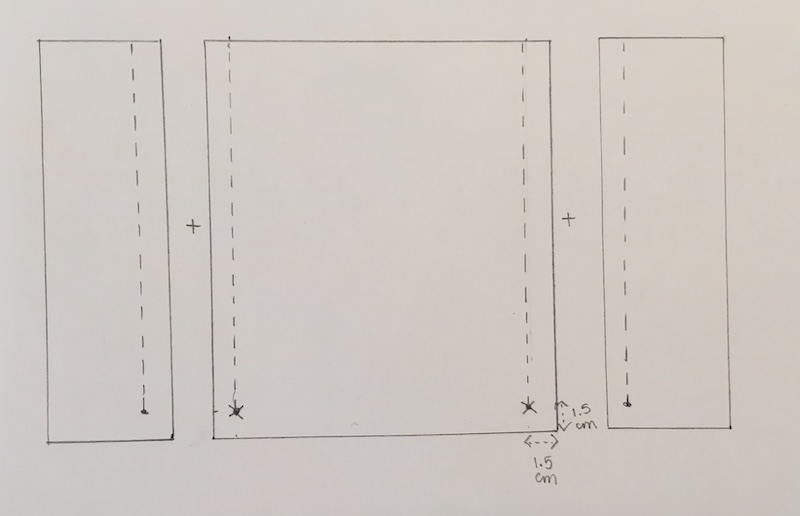
Now to these measurements I needed to add extra on each side for the seams – this is called the seam allowance – and extra at the top that would be folded down to create a hem at the top of the bag eventually. I added 1.5cm for the seam allowance to each of the sides, and the bottom, and I added 3.5cm at the top. I needed two pieces this size. The grainline would run from top to bottom (along the dotted line marked B). These front and back pieces would be 28cm x 30cm in my case… (1.5cm + 25cm + 1.5cm wide and 1.5cm + 25cm + 3.5cm top to bottom).

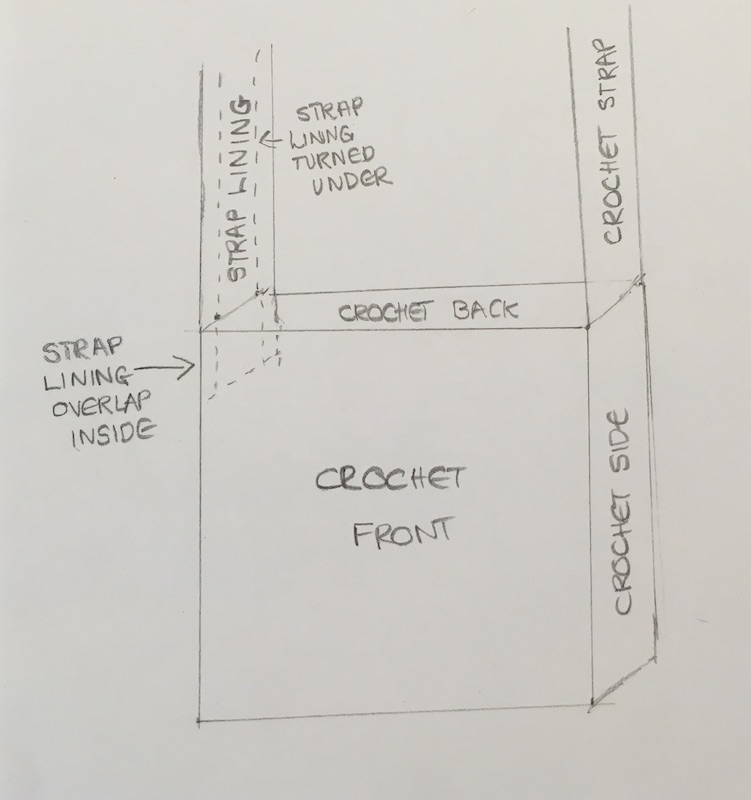
My pattern looked something like this…

Now I measured each side of the gusset – from side to side – the narrow measurement – (C) – and from top to bottom (B) which should be exactly the same size as the side of the main square. Mine measured 5cm across and 25cm from top to bottom. Again, I added 1.5cm to each side and to the bottom and 3.5cm to the top. The grainline would run from top to bottom (line B). So these pieces for me would be 8cm (ie 1.5cm + 5cm + 1.5cm) by 30cm (ie 1.5cm + 25cm + 3.5cm)

Then I measured the gusset at the bottom. The width was the same as before (C) and the length was the same as the bottom of the main square (A). As my square was 25cm wide, this strip was 5cm x 25cm. Again, don’t worry if your bottom piece is not the same as your two sides, just make sure you have the correct measurements for your bag. To this piece I added a seam allowance of 1.5cm on each side. So my final piece was 8cm (ie 1.5cm + 5cm + 1.5cm) by 28cm (ie 1.5cm + 25cm + 1.5cm).

This time the grainline ran along the strip (line A).

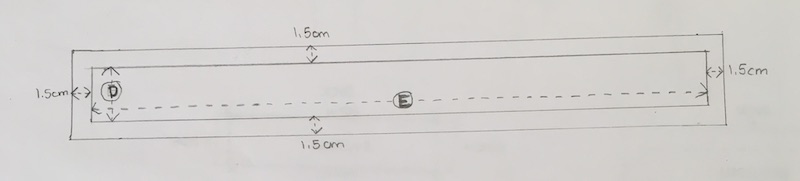
Now I just needed to measure the strap. The width (D) and the length (E). Mine measured 6.5cm by 78cm. I added 1.5cm to each long side and 3.5cm to each short end so my strip was 9.5cm (ie 1.5cm +6.5cm + 1.5cm) by 85cm (ie 3.5cm + 78cm + 3.5cm). The grainline ran along the strip (line E)

I carefully cut pieces out of my fabric. If you wanted you could make paper templates first to make sure you have the right sizes and then pin these to your fabric and cut them out.

Next you need to mark two points at the bottom of each main square – this point should be exactly 1.5cm up from the bottom and exactly 1.5cm in from the side. Mark each point clearly on the wrong side of the fabric.

Now finally it was time to start sewing the pieces together! It doesn’t really matter what colour thread you use in your machine as the stitches won’t show.

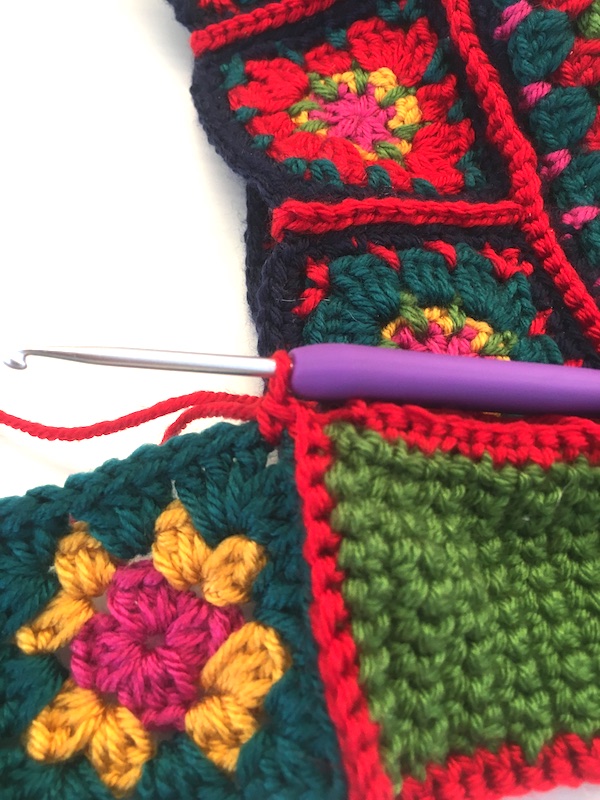
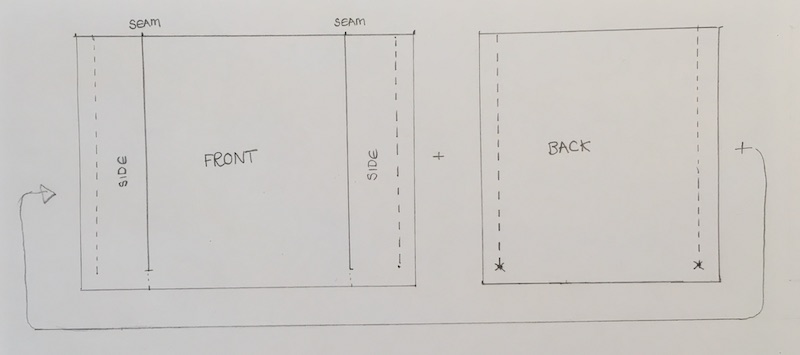
First place a side gusset piece and a main square right sides together. Make sure you have the wrong side of the main square facing you while you sew so you can see that point you marked. Sew carefully from the top, 1.5cm in from the edge and stop exactly at the marked point.

Now sew the other side gusset piece to the main square in the same way.


The pieces go in this order and you’ll be sewing along the dotted lines

Once you’ve sewn two side gusset pieces on, use an iron to press the seam open on the wrong side so it lays flat.

Now take the other main square and sew the strips to this too… You should end up with a tube. Make sure you press the seams open again after you’ve done this.

Sew the back to one side, then finally sew the back to the final side to make a tube.

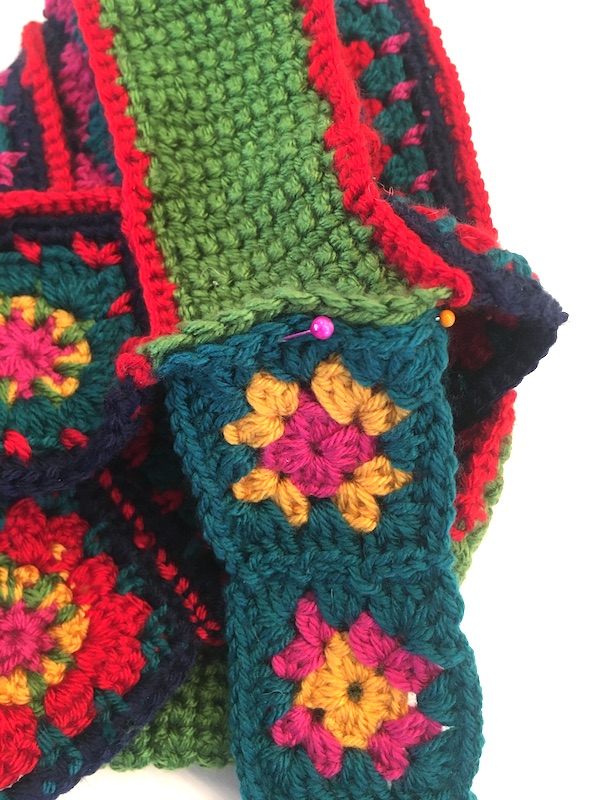
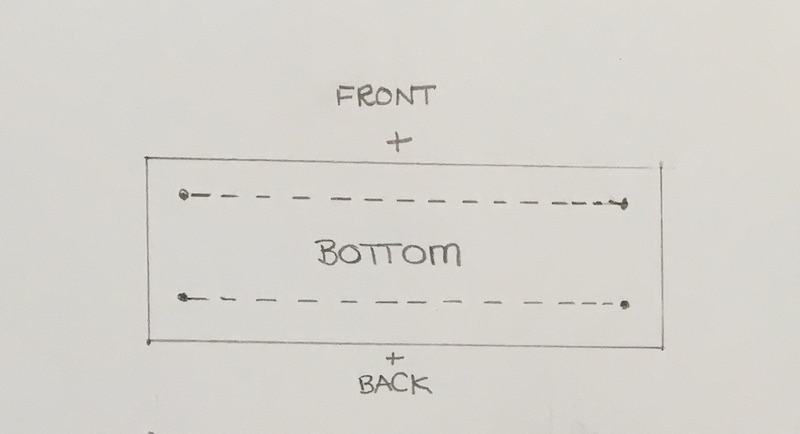
Now this next bit is a little fiddly, so make sure you pin the pieces in place before you sew. Place the bottom of the gusset right sides together with the bottom of one of the main squares and sew along the edge 1.5cm in, starting at a marked point and stopping at the other marked point. Now sew it to the bottom of the other main square. The short ends of this gusset piece are still open at this point.

You’ll be sewing along the dotted line in each case, first to the front and then to the back

Now you have another couple of seams to press flat with your iron – and this is getting more fiddly.

Next you need to put the lining flat on the table and carefully pin the short sides. This time, sew really carefully 1.5cm in from the edge, pulling all the extra fabric out of the way as you go, so you don’t accidentally catch any fabric by accident.

You can now carefully trim away a bit of the excess at each of these bottom four corners by cutting diagonally across at each point – make sure you don’t cut too close to the stitches though, as these points on the bag need to be strong as you will be carrying things in the bag eventually.

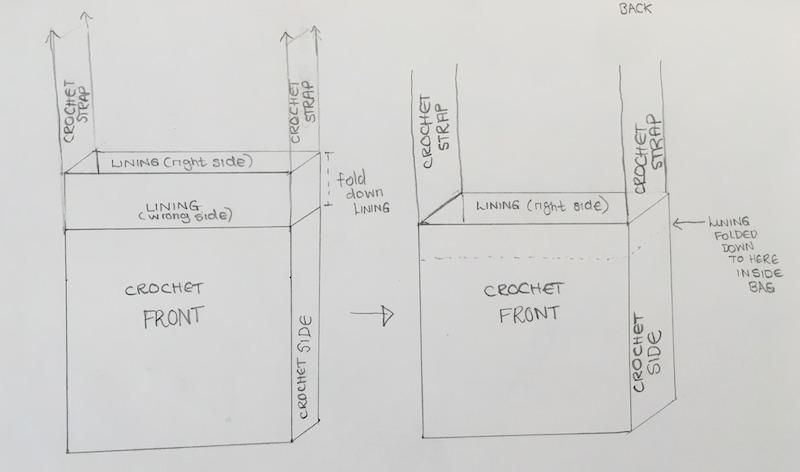
Now you can slip this lining into the bag to try it out – the right side of the fabric will be visible in the bag, with the wrong side against the crocheted sides of the bag. There should be about 3.5cm sticking out at the top all the way around. Fold the fabric down (wrong side to wrong side).

Now take the lining out again and press the fold.

Next take the strap lining, and pin it to the strap, wrong side to wrong side. Make sure there is 3.5cm overlapping on the inside at each short side. Turn in 1.5cm along each long side and pin then carefully sew along these long sides. You may wish to use your machine (but in this case, choose a suitable colour of sewing thread, as the stitches may be visible), sewing very close to the edge, however I chose to sew by hand, with tiny oversewing stitches.

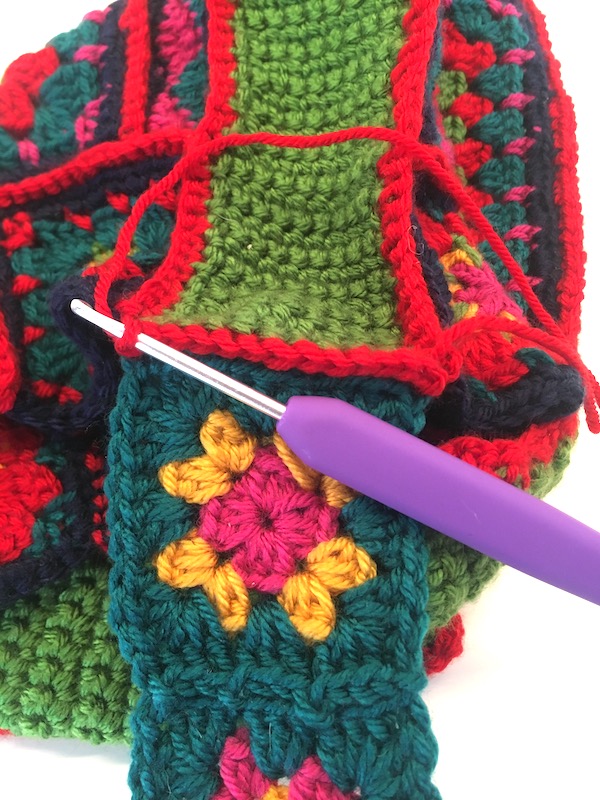
Now you’re ready to slip the lining back into the bag. This will cover up the overlap from the strap ends. Then carefully sew all the way around the edge – again, I chose to do this by hand.

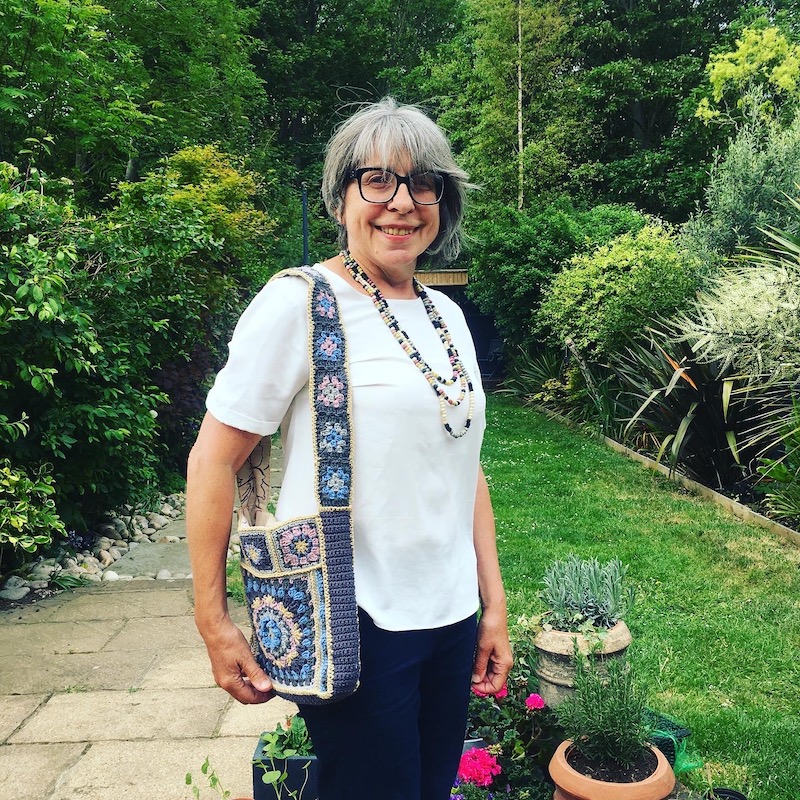
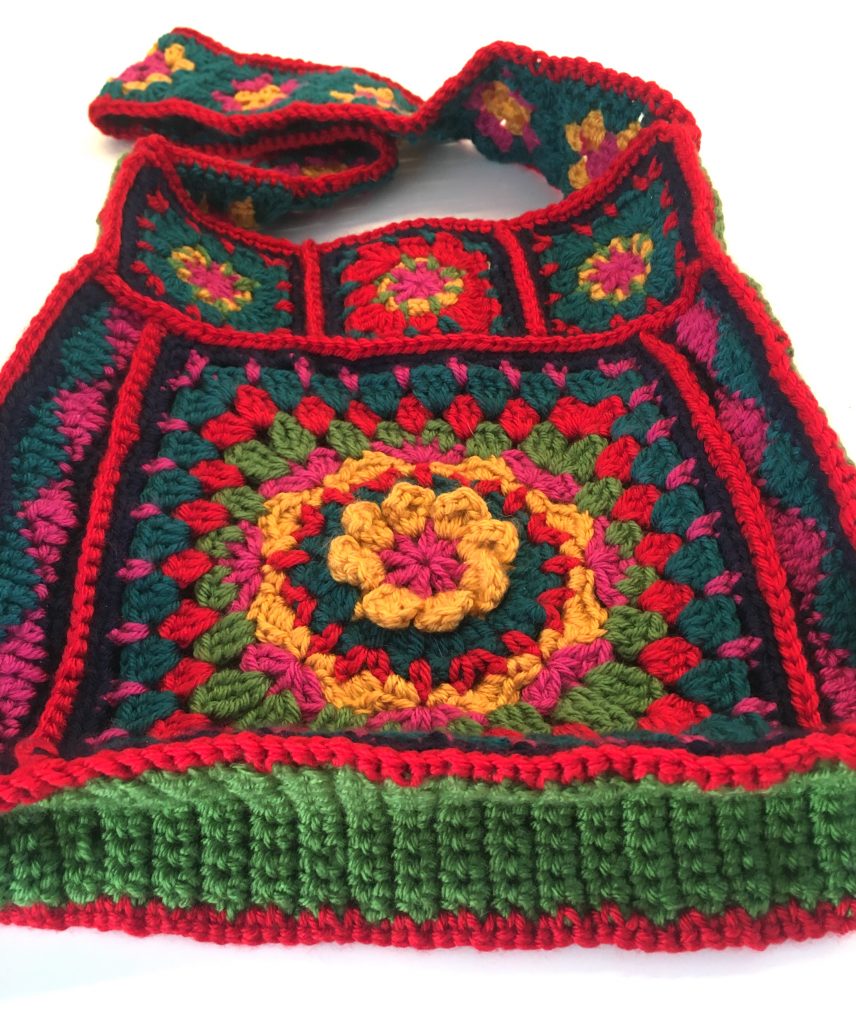
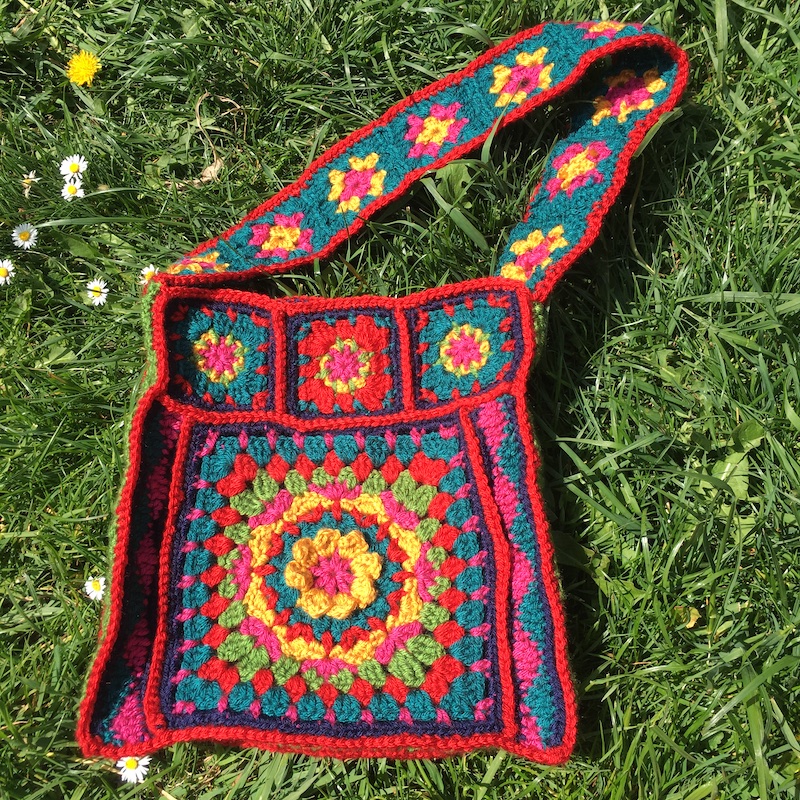
Here are some close-ups of my bag and lining…

Here’s the lining sewn to the inside of the strap
Here you can see how the gusset lining matches up with the bag and the strap
Here you can see the finished bag!

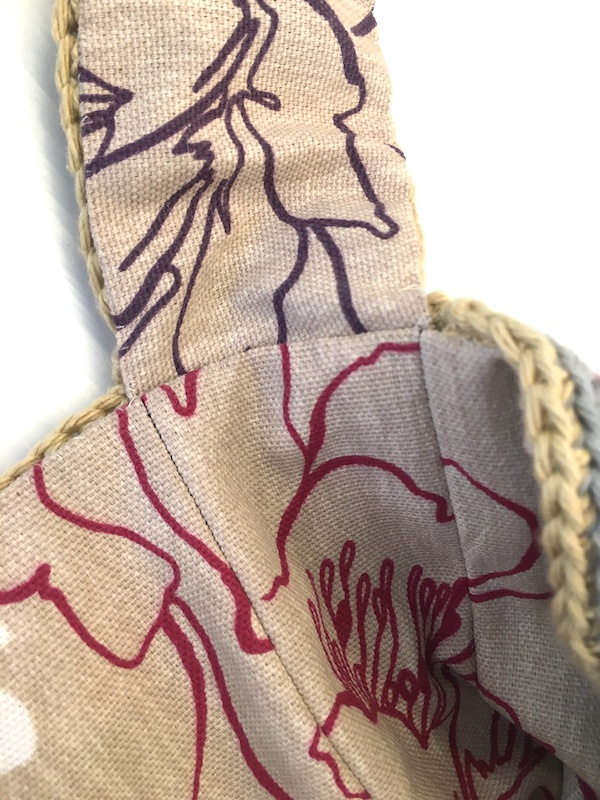
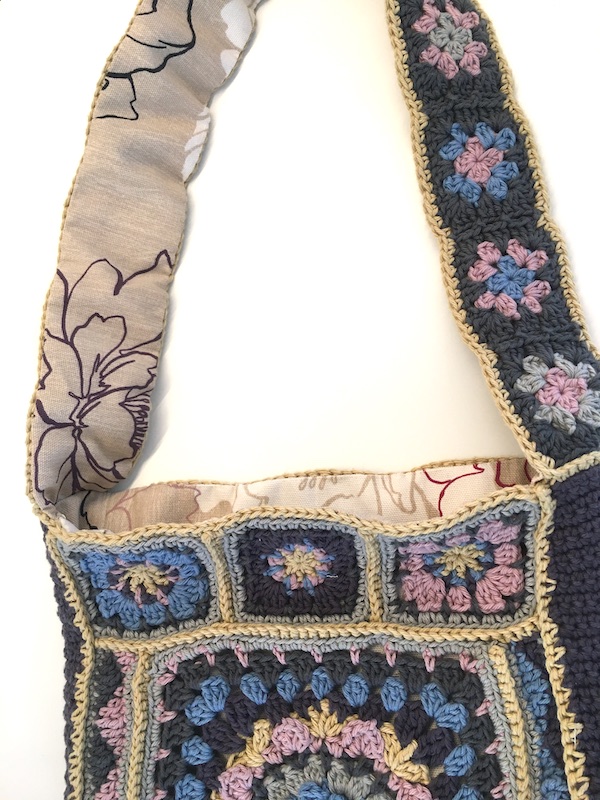
I’m really happy with how it turned out, as you can see!

Posted in: crochet, granny squares, inspiration Tagged: crochet, lining a bag, lockdown project, sewing instructions

Part 9 of CAL – finishing the bag

May 15, 2020 by Annie Leave a Comment

Part 9 – the last part is here! If you’ve only just found my blog, don’t worry, head back and do, Parts 1 (main square rounds 1-6) , Part 2 (rows 7-9), Part 3 (finishing the main square) , Part 4 (small squares) , Part 5 (side strips) , Part 6 (finishing the sides) , Part 7 (gusset) and Part 8 ( strap squares) first. And if you prefer standard written instructions, head here.

PART 9 ATTACH THE STRAP AND FINISHING TOUCHES

Attaching the strap

First we’re going to attach the main bit of the bag to the strap and edge the strap. First, position one of the short edges of the strap next to the end of the gusset with wrong sides together, and strap facing you.

Pinned in place

Then, starting at the corner, work across the end of the strap and the gusset in double crochet catching one loop from each side for each stitch as before.

Double crochet across the gusset and strap end

At the corner, turn your work

Here I’ve turned the work and am starting to work along the side of the strap

and with the right side of the strap still facing you, work all the way along the edge of the strap. You’ll be working 1dc each corner space of a small square and 1dc in each stitch until you get to the end of the strap – so for each square, that’s one dc in the corner space, 9dc in stitches along the edge of the square and one dc in the corner space.

Here’s the side of one square completed

Now position the short end of the strap against the gusset, again with wrong sides together and the strap still facing you,

One side of the strap completed, turned again and ready to dc the other short end to the gusset

work across short side and the gusset, then along the other edge of the strap as before. Join with ss to first st. Fasten off.

Here’s the strap attached and edged

Final touch!

Finally, edge the tops of the sides by joining yarn in corner sp of gusset and with right side of bag facing, work in dc across the top edge (ie along the top of the small squares), finishing with a dc in the space on the gusset again. Complete other top edge to match.

Start in the corner and make sure it’s secured to the gusset corner too
Once the ends have been sewn, the bag’s finished

Ta-da! You have your spring bag!

Your bag is ready to go, but if you like, you could add a lining. There are instructions how to do this here.

I hope you’ve enjoyed following along and maybe learned some new techniques along the way. If you’ve made a bag, please send me a photo, or share one in the comments here, or post it on my Picking Up Stitches facebook page as I’d love to see them.

Posted in: crochet, Crochet patterns, granny squares Tagged: crochet along, crochet project, lockdown crochet, lockdown project

Part 8 of CAL – strap squares

May 11, 2020 by Annie Leave a Comment

This is Part 8 of the CAL. Have you been following along? If so, you’re ready to go. If not head back and do, Parts 1 (main square rounds 1-6) , Part 2 (rows 7-9), Part 3 (finishing the main square) , Part 4 (small squares) , Part 5 (side strips) , Part 6 (finishing the sides) and Part 7 (gusset) first.. If you prefer to follow standard written instructions instead of the version with lots of pictures, head here.

PART 8 STRAP SQUARES

Make 12 or as many as you prefer for the length of the strap)

These are like mini granny squares, worked in groups of half trebles. There are only three rounds, the first two are regular rounds and then the third round is used to join a square to the next one – it’s a method called JAYG which stands for Join As You Go

Round 1: In a magic circle, work 2chain [counts as htr], then work 2htr, now a bit to repeat three times: (2ch, 3htr). Finally, work 2ch, and join with ss to top of the second chain. Fasten off. As usual you can start with a ring made up of 4chain stitches slip stitched together instead if you can’t do the magic circle.

First round of Part 8 of the CAL

How cute is that little square!

Round 2: Join yarn in a 2ch-space, and work (2ch [counts as htr], 2htr, 1ch 3htr), * in the next corner 2ch-sp work (3htr, 1ch, 3htr), rep from * twice, join with ss to 2nd ch. Fasten off.

The next round is only done on the very first square you make.

(For first square only) Round 3: Join yarn in a 1ch-sp in a corner, now work (3ch [counts as tr], 2tr, 2ch, 3tr) – this is the corner, * in the next space (ie between two groups of three trebles, on the side of the square), work 3tr, in the next corner space work (3tr, 2ch, 3tr), go back and repeat from * twice, then to finish, in the next side space work 3tr, join with ss to the 3rd ch. Fasten off.

The first square looks like this..

The first square of Part 8 of the Spring Bag CAL

Now comes the clever round that you work on each square you make from now on – it sounds a bit complicated, but as long as you remember that you’re aiming to join along one side of the square to the one you’ve already made, it should make sense. And I’ve included lots of pictures to help. But if you do find it too complicated (which I’m sure you won’t) then you could just make the squares all as the first one, then sew or crochet all the individual squares together. However, give the JAYG method first, you’ll be glad you did once you get the hang of it!

(All subsequent squares) Round 3: Join yarn in a corner space, and work (3ch [counts as a treble], 2 more trebles, 2chain stitches and 3 trebles),

* in  next space between groups of stitches on the side, work 3trebles, in the next corner space, work (3tr, 2ch, 3tr),

in next sp work 3tr.

Now comes the joining bit – you’re going to need to place your completed square next to the one you’re working.

In the next corner space work 3tr, then 1chain.

You need both squares together for this bit

Now put your hook from front to back through the bottom right corner of the completed square making sure the right side of that square is facing you (see the picture below).

and work a slip stitch, which attaches the two squares together.

Here I’ve worked a slip stitch and you can see that the two corners are joined

Now work 3tr in the corner space on your current square,

inset the hook into the space between groups of trebles on the completed square

and slip stitch here to join at this point too,

Here’s the beginning of the slip stitch – just need to pull it straight through the loop on the hook next
Slip stitch completed

then 3tr in the next space between groups of trebles on current square,

slip stitch through the next space on completed square again,

Hook through the space…
and slip stitch the squares together

work 3 trebles in corner space on the current square,

then 1ch, now slip stitch through the corner space on completed square,

hook through the corner space…
and slip stitch together

then 3 treble in corner space on current square.

Three trebles to complete the corner

– that’s the joining bit completed, so now just work 3 trebles in the final space on the current square,

Carry on making and joining squares in Part 8 until the strap is the desired length

and join with a ss to the 3rd ch.

Fasten off.

Now attach another square that you’ve worked two rounds on to the strip in the same way.

I’m sure you’ll soon get the hang of it once you’ve made a few.

You can make as many squares as you like depending on how long you want your finished strap to be.

Once that’s done, block your strap out, and you’re ready to complete the bag in the next part – part 9, which is here.

If you get stuck, just email or contact me on facebook, instagram or twitter and I’ll try to help. And don’t forget to share all your pictures on social media! #SpringBagCAL

Posted in: crochet, Crochet patterns, granny squares Tagged: crochet, crochet along, crochet project, lockdown crochet
1 2 3 Next »

Recent Posts

  • Crocheted daffodils for Easter
  • Spring crochet in pastel shades
  • Easter Bunnies
  • December is here!
  • Crocheted plantpots

Archives

  • March 2024
  • February 2024
  • February 2023
  • December 2022
  • May 2022
  • November 2021
  • February 2021
  • November 2020
  • May 2020
  • April 2020
  • February 2020
  • January 2020
  • November 2019
  • January 2019
  • December 2018
  • November 2018
  • September 2018
  • July 2018
  • April 2018
  • March 2018
  • February 2018
  • December 2017
  • October 2017
  • September 2017
  • August 2017
  • July 2017
  • June 2017
  • May 2017
  • April 2017

Categories

  • Bunting
  • Christmas
  • classes
  • craft fair
  • crochet
  • Crochet patterns
  • granny squares
  • inspiration
  • Interviews
  • knitting
  • knitting patterns
  • Thanet news
  • Uncategorized
  • workshops

Pages

  • All about me
  • Blog
  • Favourite links to blogs, places and people
  • Features and Interviews
    • An interview with Dee Hardwicke
    • Knitwear designer Martin Storey – an interview
    • Louisa Harding, knitwear designer talks to Annie Windley
  • How to guides
    • 1 Making a slip knot
    • 2 Cast on – a step-by-step guide
    • 3 Knit stitch – a step-by-step guide
    • 4 Purl stitch – a step-by-step guide
    • 5 Cast off – a step-by-step guide
    • 6 Making a chain stitch
    • 7 Making a double crochet stitch
    • 8 Making a treble crochet stitch
    • How to make a Basic Granny Square
    • Joining granny squares
  • Lessons in Thanet and North London
    • Crochet projects
    • Now We’re Knitting! (beginners)
  • Patterns
    • Annie’s Advent Calendar: Christmas CAL 2018
    • Carrot & pea bunting pattern
    • Fallen Leaves Autumn Cowl
    • Floral granny squares & little flowers pattern
    • Little crochet heart pattern
    • Little Tea Cosy pattern
    • Waffle Blanket
  • Shop
  • Spring Granny-Square Bag CAL pattern

Meta

  • Log in
  • Entries feed
  • Comments feed
  • WordPress.org

Follow me on social media

Twitter
Facebook
Instagram

Copyright © 2025 Picking Up Stitches.

Omega WordPress Theme by ThemeHall